Setting IP Filters
Setting IP Filters
IP access lists filter traffic to your ClickHouse services by specifying which source addresses are permitted to connect to your ClickHouse service. The lists are configurable for each service. Lists can be configured during the deployment of a service, or afterward. If you do not configure an IP access list during provisioning, or if you want to make changes to your initial list, then you can make those changes by selecting the service and then the Security tab.
If you skip the creation of the IP Access List for a ClickHouse Cloud service then no traffic will be permitted to the service.
Prepare
Before you begin, collect the IP Addresses or ranges that should be added to the access list. Take into consideration remote workers, on-call locations, VPNs, etc. The IP Access List user interface accepts individual addresses and CIDR notation.
Classless Inter-domain Routing (CIDR) notation, allows you to specify IP Address ranges smaller than the traditional Class A, B, or C (8, 6, or 24) subnet mask sizes. ARIN and several other organizations provide CIDR calculators if you need one, and if you would like more information on CIDR notation, please see the Classless Inter-domain Routing (CIDR) RFC.
Create or modify an IP Access List
From your ClickHouse Cloud services list select the service and then select Settings. This will show the existing IP Access List, which may be set to:
- Allow incoming traffic from anywhere to the service
- Allow access from specific locations to the service
- Deny all access to the service
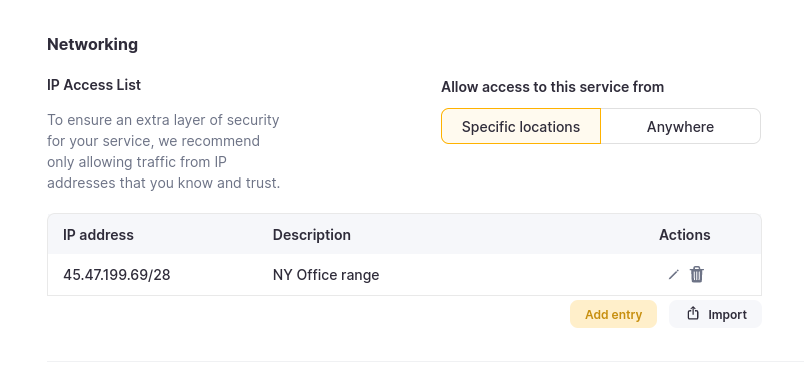
This screenshot shows an access list which allows traffic from a range of IP Addresses, described as "NY Office range":

Possible actions
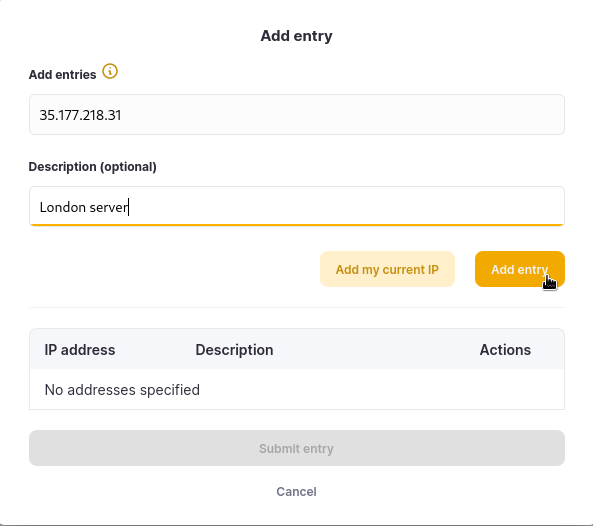
To add an additional entry you can use + Add entry
This example adds a single IP address, with a description of
London server:
Delete an existing entry
Clicking the trash can deletes an entry
Edit an existing entry
Clicking the pencil icon allows editing an entry
Switch to allow access from Anywhere
This is not recommended, but it is allowed. We recommend that you expose an application built on top of ClickHouse to the public and restrict access to the back-end ClickHouse Cloud service.
Verification
Once you create your filter confirm connectivity from within the range, and confirm that connections from outside the permitted range are denied. A simple curl command can be used to verify:
curl https://<HOSTNAME>.clickhouse.cloud:8443
curl: (35) error:02FFF036:system library:func(4095):Connection reset by peer
or
curl: (35) LibreSSL SSL_connect: SSL_ERROR_SYSCALL in connection to HOSTNAME.clickhouse.cloud:8443
curl https://<HOSTNAME>.clickhouse.cloud:8443
Ok.
Importing and exporting filters
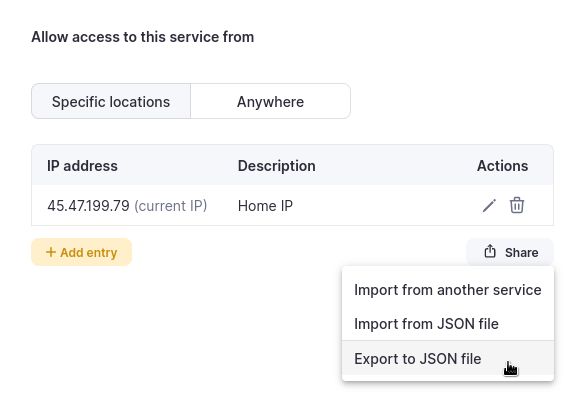
From the Security tab you can also share (import or export) your filters.

If you import filters they will be appended to the existing filter list.
Here is an example of an exported filter list:
{
    "addresses": [
        {
            "address": "45.47.199.79",
            "description": "Home IP"
        }
    ]
}
If you do not configure an IP Access List, then there will be no access to your ClickHouse Cloud service.
Limitations
- Currently, IP Access Lists support only IPv4