Azure Private Link
Azure Private Link can be enabled only on ClickHouse Cloud Production services. Development services are not supported.
This guide shows how to use Azure Private Link to provide private connectivity via a virtual network between Azure (including customer-owned and Microsoft Partner services) and ClickHouse Cloud. Azure Private Link simplifies the network architecture and secures the connection between endpoints in Azure by eliminating data exposure to the public internet.
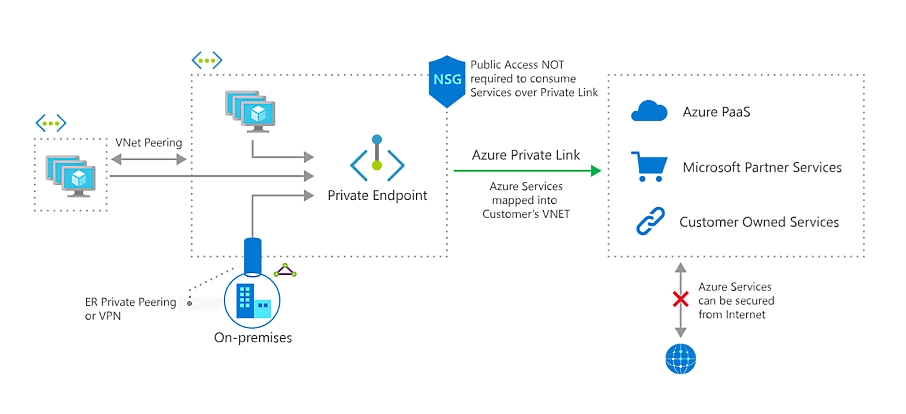
Unlike AWS and GCP, Azure supports cross-region connectivity via Private Link. This enables you to establish connections between VNETs located in different regions where you have ClickHouse services deployed.
Additional charges may be applied to inter-region traffic. Please check latest Azure documentation.
Please complete the following steps to enable Azure Private Link:
- Obtain Azure connection alias for Private Link
- Create a Private Endpoint in Azure
- Add the Private Endpoint GUID to your ClickHouse Cloud organization
- Add the Private Endpoint GUID to your service(s) allow list
- Access your ClickHouse Cloud service using Private Link
Find complete Terraform example for Azure Private Link here.
Obtain Azure connection alias for Private Link
ClickHouse Cloud console
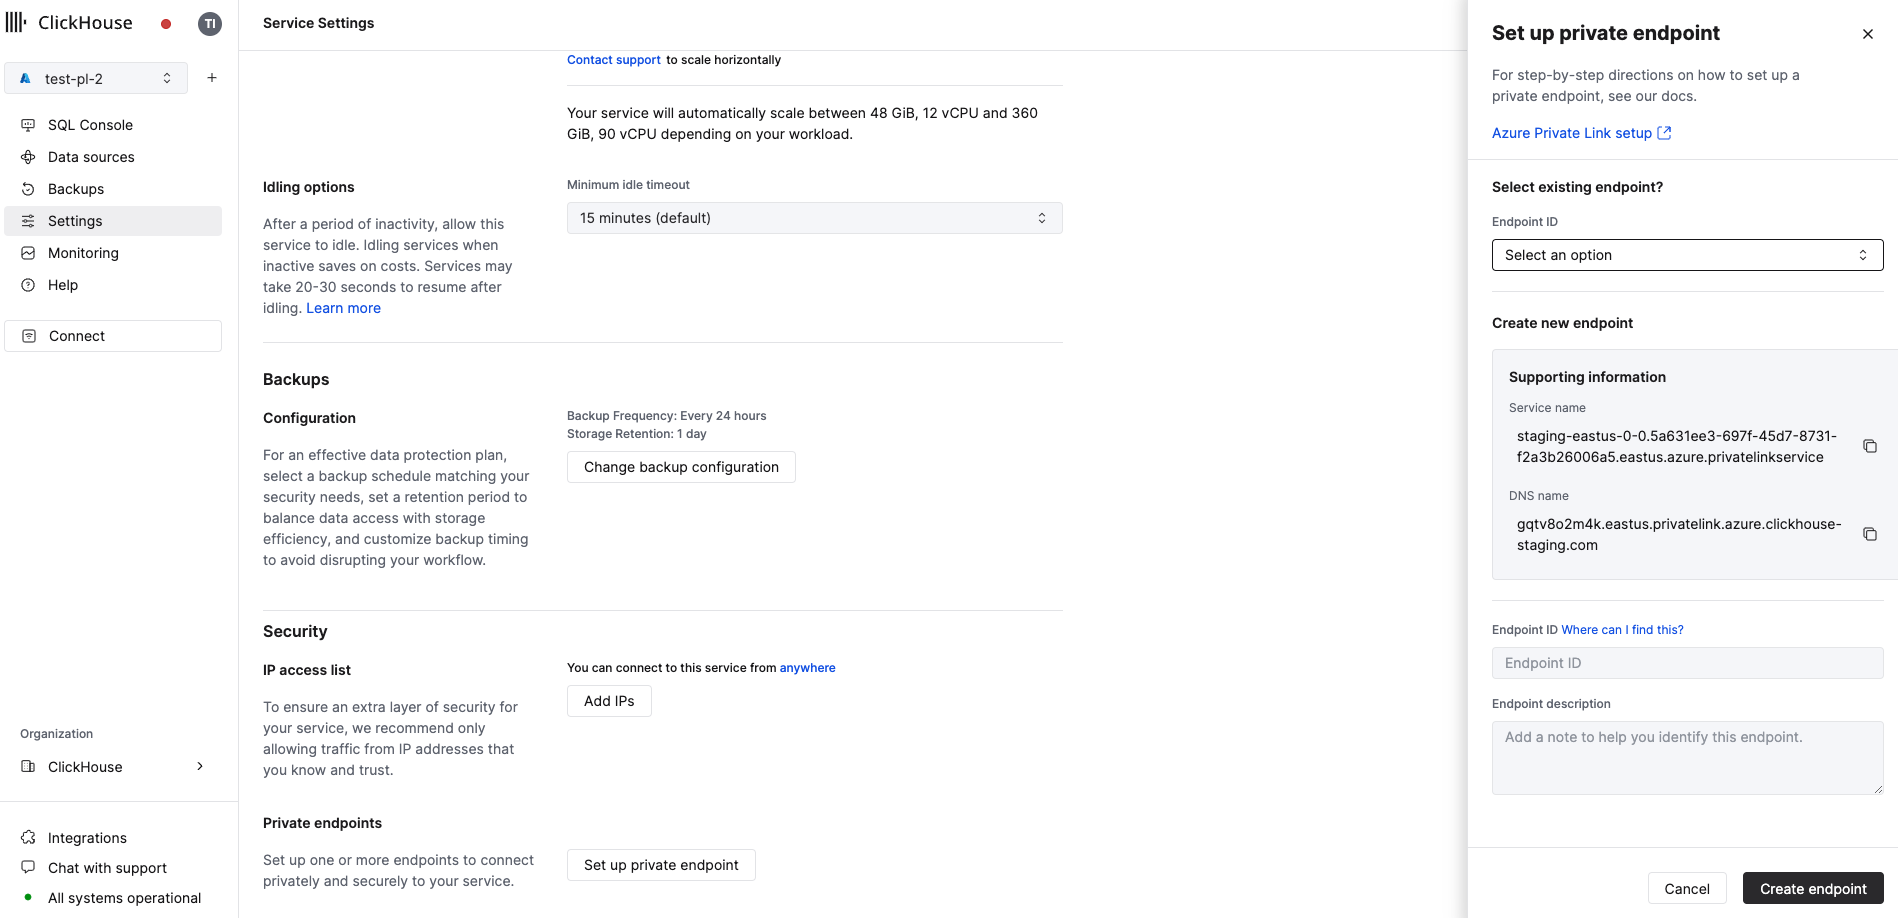
In the ClickHouse Cloud console, open the service that you would like to connect via PrivateLink, then open the Settings menu. Click on the Set up private endpoint button. Copy the Service name which will be used for setting up Private Link.
API
Before you get started, you'll need a ClickHouse Cloud API key. You can create a new key or use an existing one. Note that you will need an Admin key to manage the Private Link configuration.
Once you have your API key, set the following environment variables before running any commands:
REGION=<region code, use Azure format>
PROVIDER=azure
KEY_ID=<Key ID>
KEY_SECRET=<Key secret>
ORG_ID=<set ClickHouse organization ID>
Obtain an instance ID from your region:
You'll need at least one ClickHouse Cloud service deployed in the specified region to perform this step.
curl --silent --user ${KEY_ID:?}:${KEY_SECRET:?} https://api.clickhouse.cloud/v1/organizations/${ORG_ID:?}/services | jq ".result[] | select (.region==\"${REGION:?}\" and .provider==\"${PROVIDER:?}\") | .id " -r | head -1 | tee instance_id
Create an INSTANCE_ID environment variable using the ID you received in the previous step:
INSTANCE_ID=$(cat instance_id)
Obtain your Azure connection alias and Private DNS hostname for Private Link:
curl --silent --user ${KEY_ID:?}:${KEY_SECRET:?} https://api.clickhouse.cloud/v1/organizations/${ORG_ID:?}/services/${INSTANCE_ID:?}/privateEndpointConfig | jq  .result
{
  "endpointServiceId": "production-westus3-0-0.63c890a9-4d32-48cc-a08c-8cd92dfb1ad3.westus3.azure.privatelinkservice",
  ...
}
Make a note of the endpointServiceId. You'll use it in the next step.
Create a Private Endpoint in Azure
In this section, we're going to create a Private Endpoint in Azure. You can use either the Azure Portal or Terraform.
Using Azure Portal to create a Private Endpoint in Azure
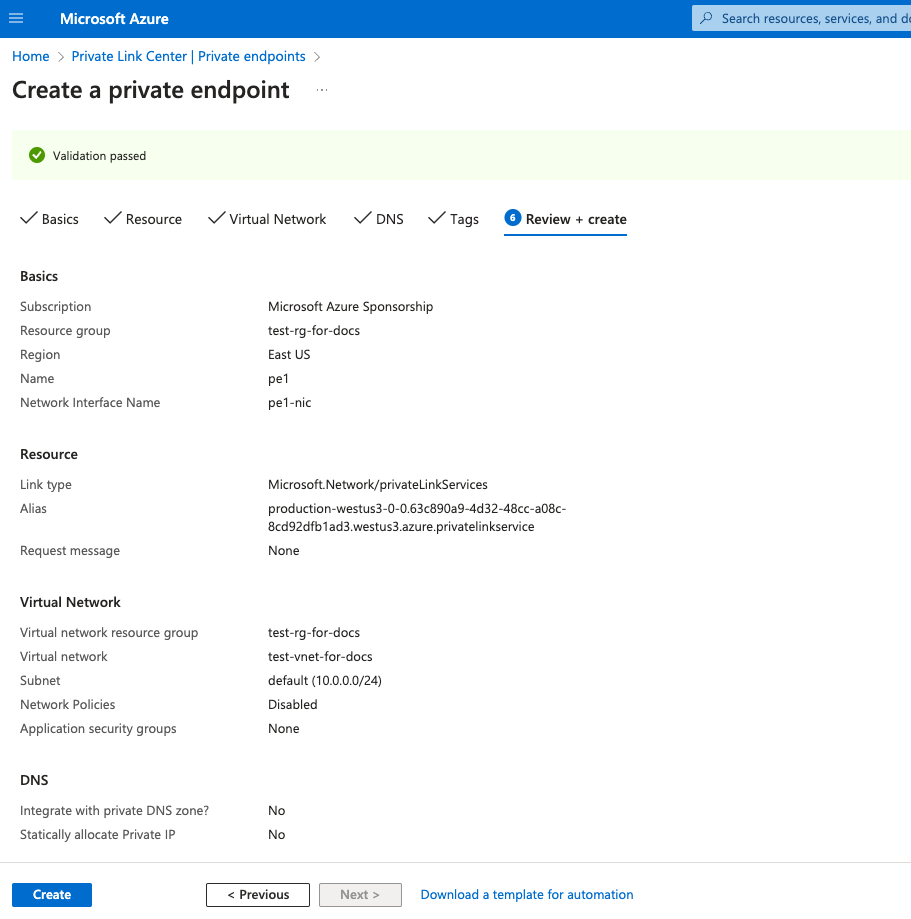
In the Azure Portal, open Private Link Center → Private Endpoints.
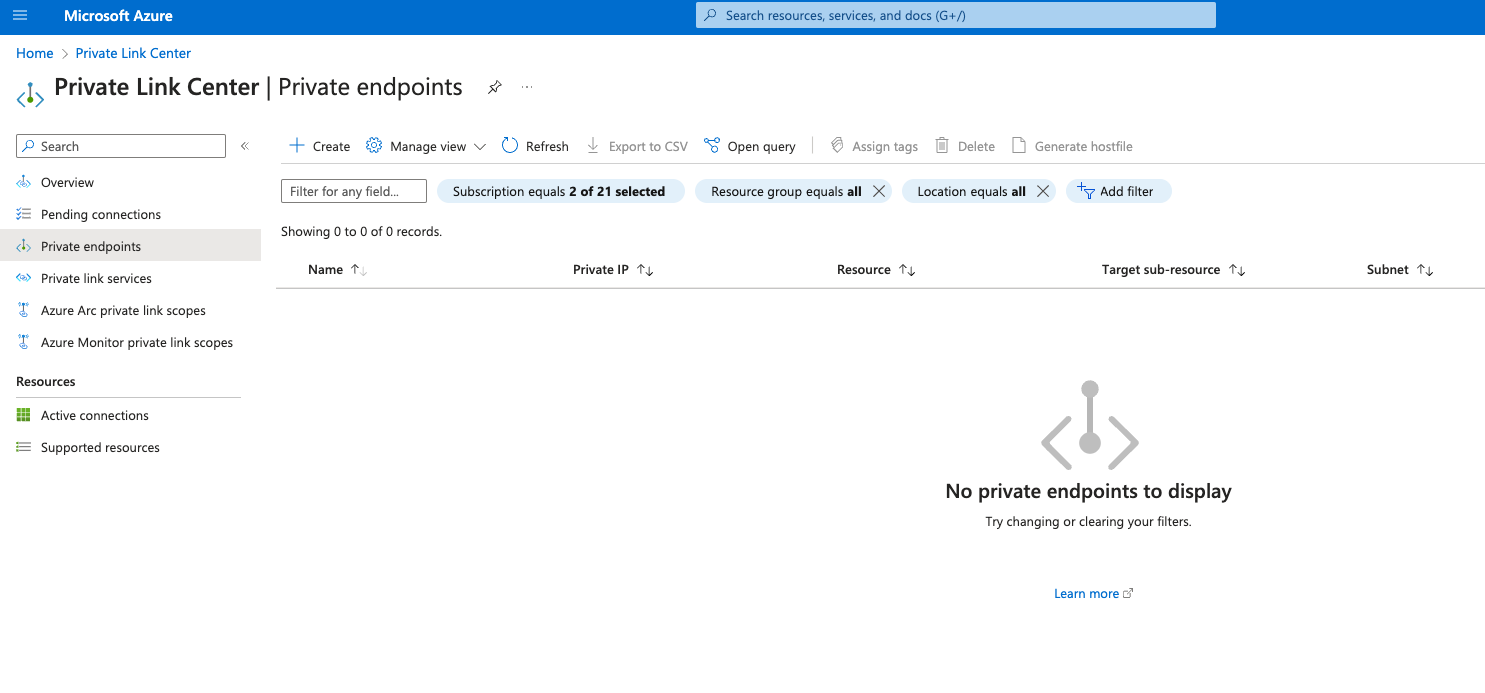
Open the Private Endpoint creation dialog by clicking on the Create button.

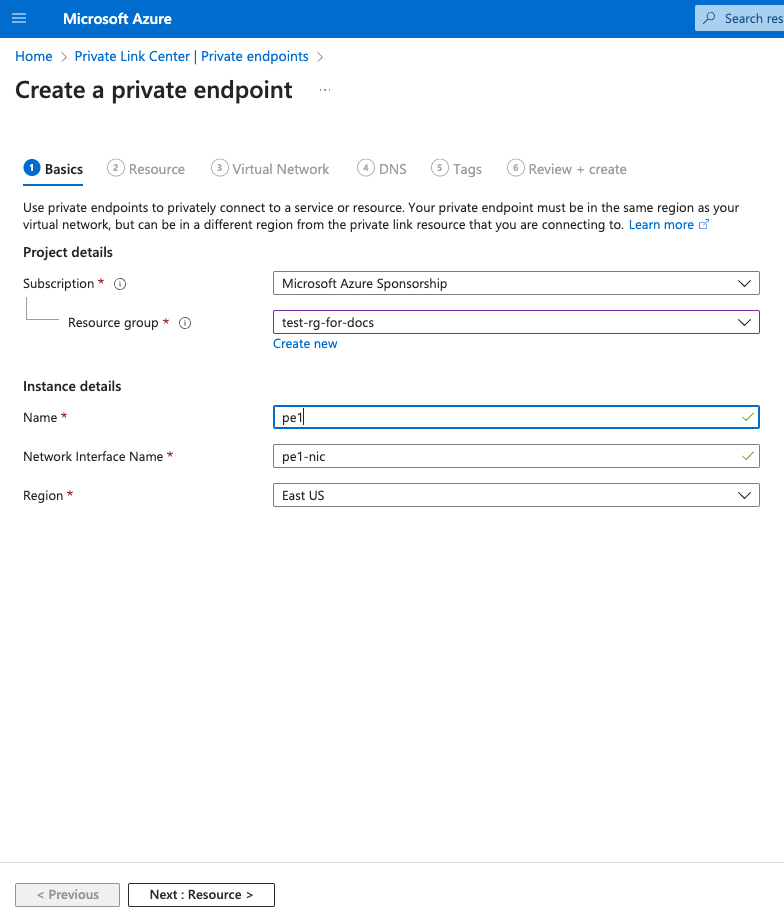
In the following screen, specify the following options:
- Subscription / Resource Group: Please choose the Azure subscription and resource group for the Private Endpoint.
- Name: Set a name for the Private Endpoint.
- Region: Choose region where the deployed VNET that will be connected to ClickHouse Cloud via Private Link.
After you have completed the above steps, click the Next: Resource button.
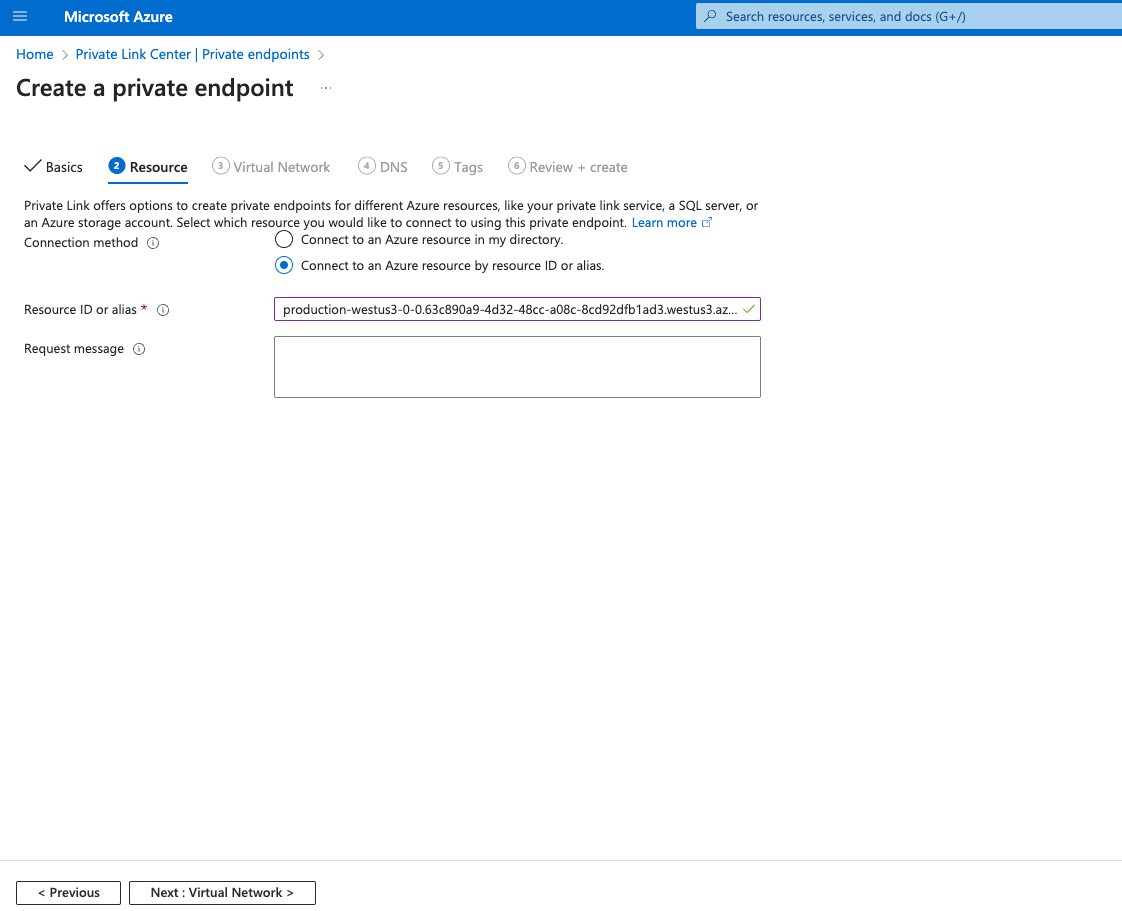
Select the option Connect to an Azure resource by resource ID or alias.
For the Resource ID or alias, use the endpointServiceId you have obtained from the Obtain Azure connection alias for Private Link step.
Click Next: Virtual Network button.
- Virtual network: Choose the VNET you want to connect to ClickHouse Cloud using Private Link
- Subnet: Choose the subnet where Private Endpoint will be created
Optional:
- Application security group: You can attach ASG to Private Endpoint and use it in Network Security Groups to filter network traffic to/from Private Endpoint.
Click Next: DNS button.
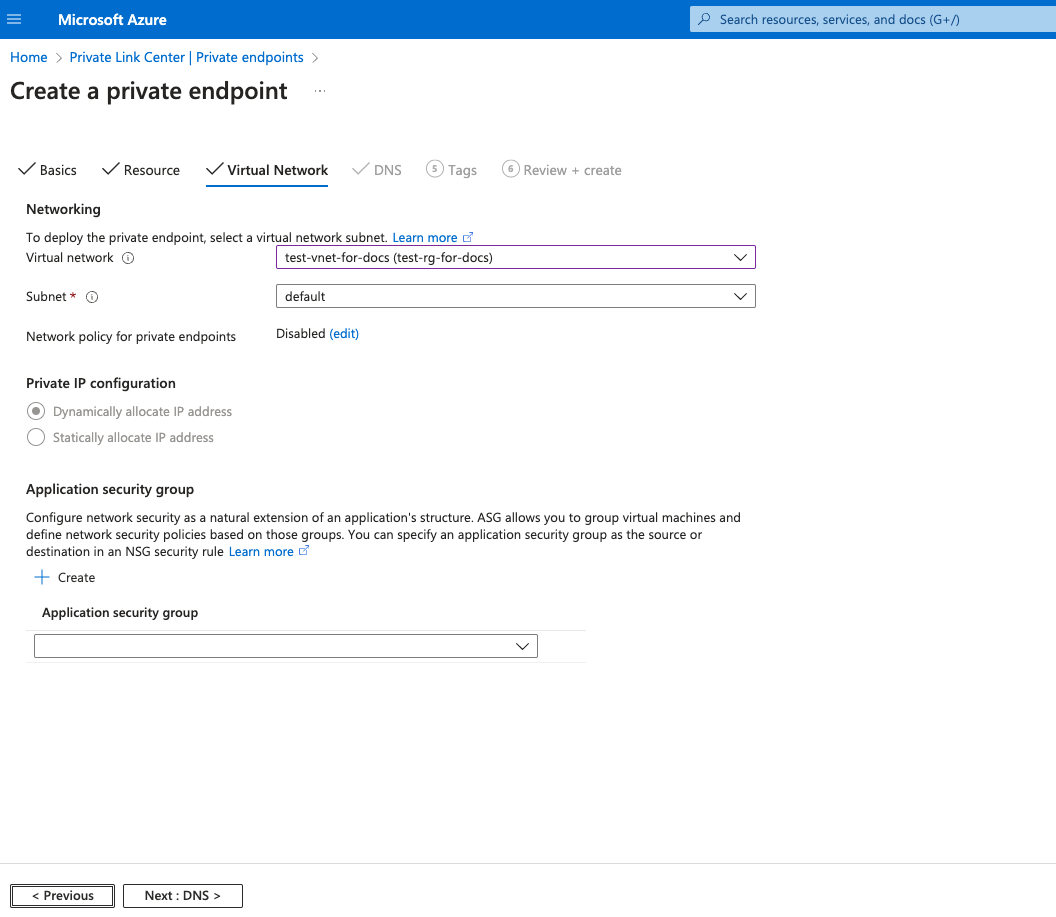
Click the Next: Tags button.
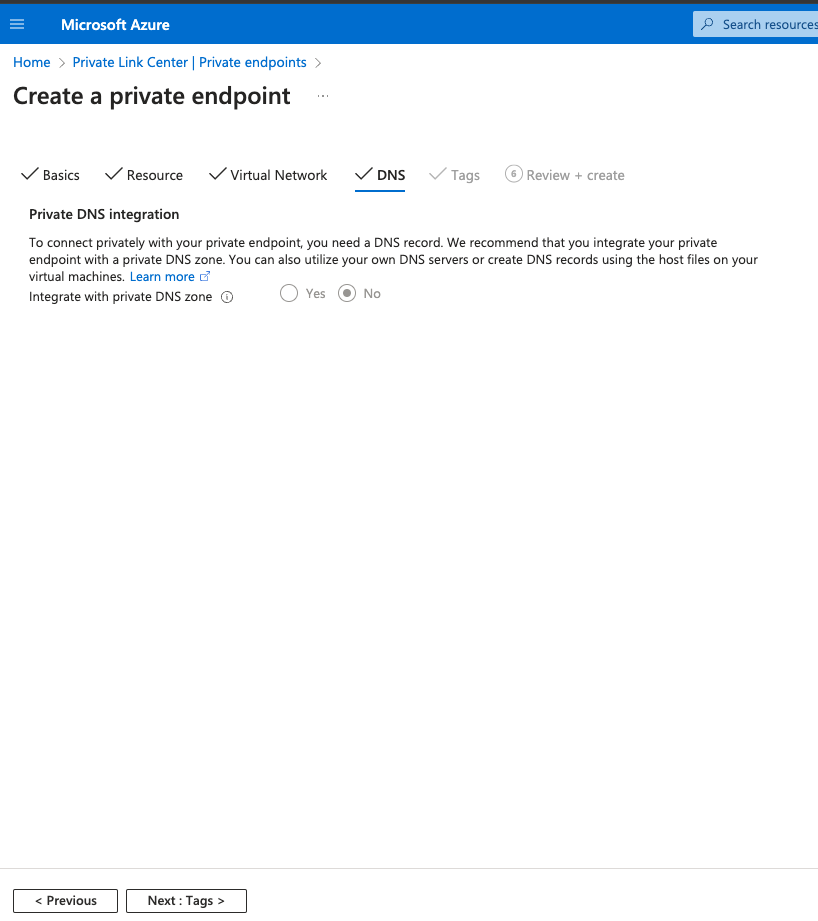
Optionally, you can attach tags to your Private Endpoint.
Click the Next: Review + create button.
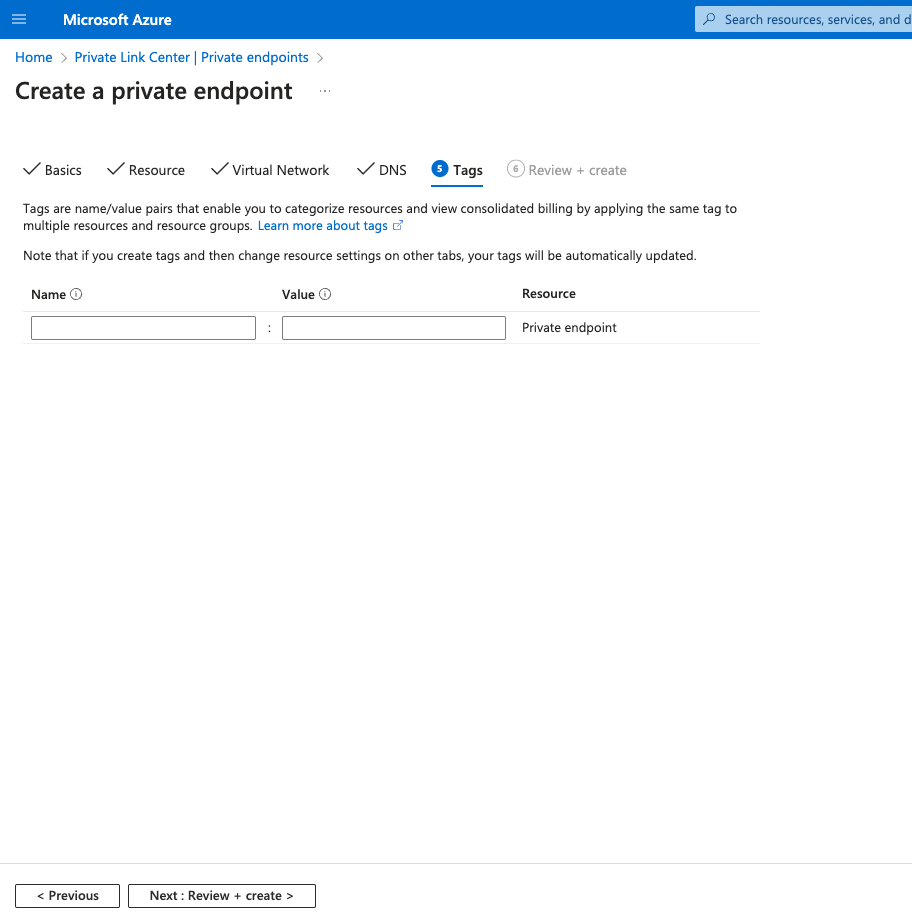
Finally, click the Create button.
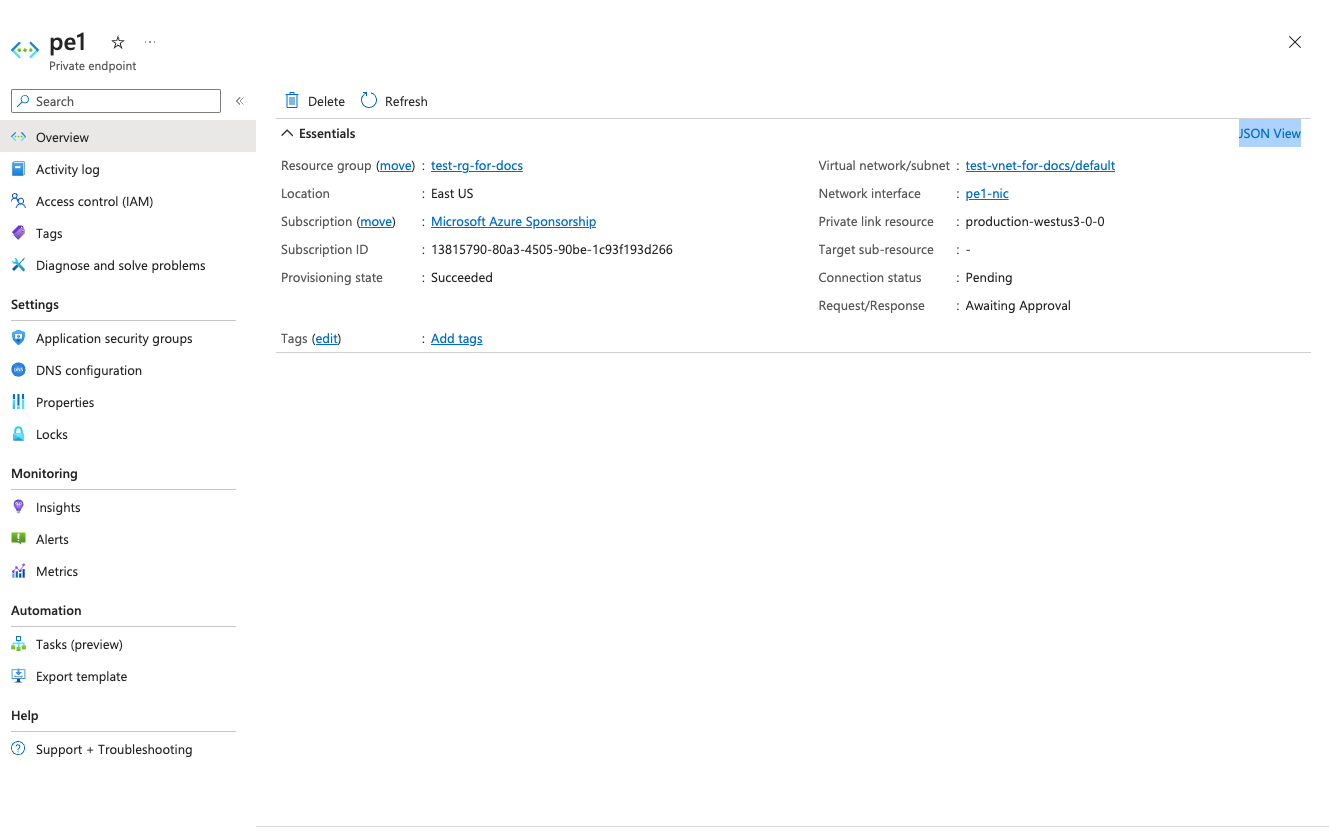
The Connection status of the created Private Endpoint will be in Pending state. It will change to Approved state once you add this Private Endpoint to the service allow list.
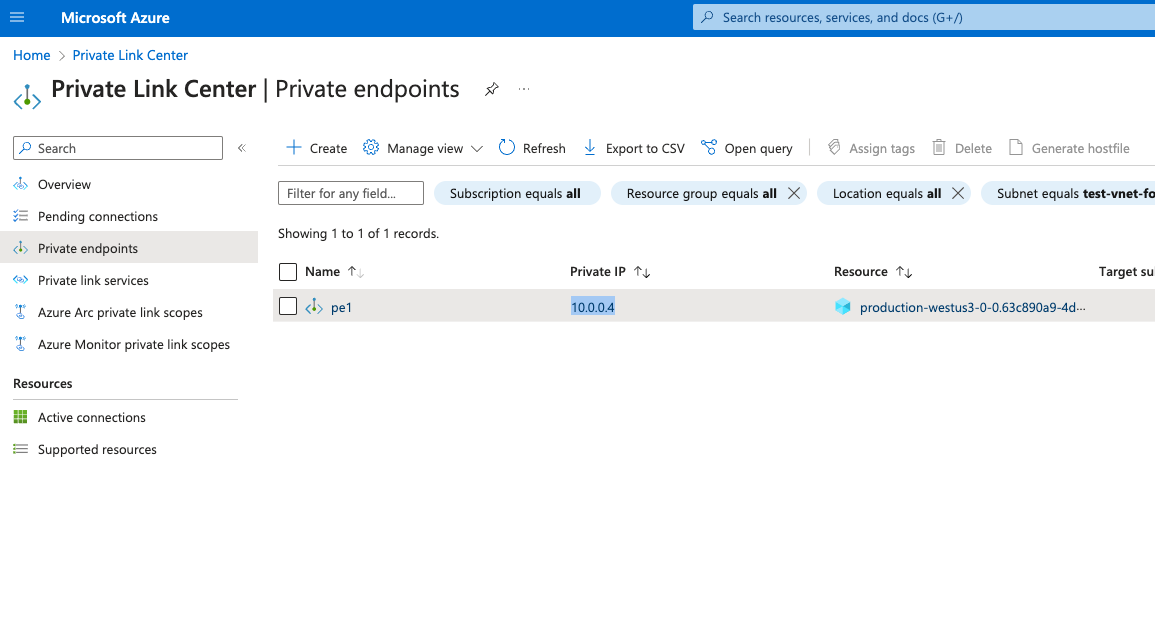
Open the network interface associated with Private Endpoint and copy the Private IPv4 address(10.0.0.4 in this example), you will need this information in the next steps.
Using Terraform to create a Private Endpoint in Azurue
Use the template below to use Terrafrom to create a Private Endpoint:
resource "azurerm_private_endpoint" "example_clickhouse_cloud" {
  name                = var.pe_name
  location            = var.pe_location
  resource_group_name = var.pe_resource_group_name
  subnet_id           = var.pe_subnet_id

  private_service_connection {
    name                              = "test-pl"
    private_connection_resource_alias = "<data from 'Obtain Azure connection alias for Private Link' step>"
    is_manual_connection              = true
  }
}
Obtaining the Private Endpoint resourceGuid
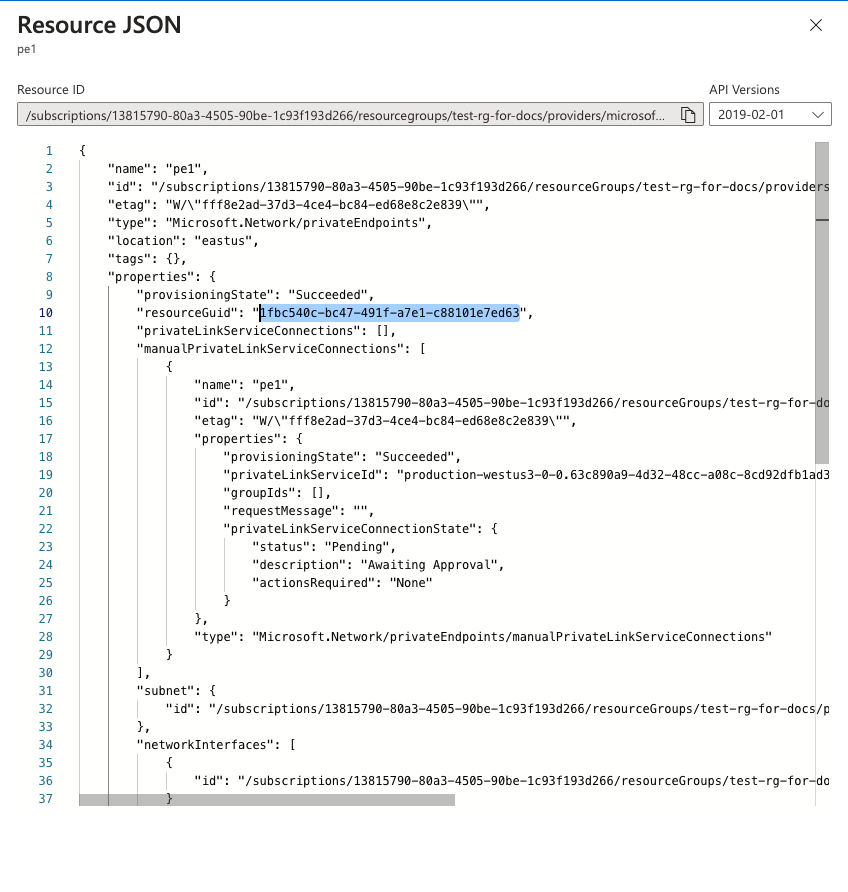
In order to use Private Link, you need to add the Private Endpoint connection GUID to your service allow list.
The Private Endpoint resource GUID is only exposed in the Azure Portal. Open the Private Endpoint created in previous step and click JSON View:
Under properties, find resourceGuid field and copy this value:
Setting up DNS for Private Link
You need will need to create a Private DNS zone (${location_code}.privatelink.azure.clickhouse.cloud) and attach it to your VNET to access resources via Private Link.
Create Private DNS zone
Using Azure portal
Please follow the following guide to create an Azure private DNS zone using the Azure Portal.
Using Terraform
Use the following Terraform template to create a Private DNS zone:
resource "azurerm_private_dns_zone" "clickhouse_cloud_private_link_zone" {
  name                = "${var.location}.privatelink.azure.clickhouse.cloud"
  resource_group_name = var.resource_group_name
}
Create a wildcard DNS record
Create a wildcard record and point to your Private Endpoint:
Using Azure Portal
- Open the MyAzureResourceGroup resource group and select the
${region_code}.privatelink.azure.clickhouse.cloudprivate zone. - Select + Record set.
- For Name, type
*. - For IP Address, type the IP address you see for Private Endpoint.
- Select OK.

Using Terraform
Use the following Terraform template to create a wildcard DNS record:
resource "azurerm_private_dns_a_record" "example" {
  name                = "*"
  zone_name           = var.zone_name
  resource_group_name = var.resource_group_name
  ttl                 = 300
  records             = ["10.0.0.4"]
}
Create a virtual network link
To link the private DNS zone to a virtual network, you'll need create a virtual network link.
Using Azure Portal
Please follow the following guide to link the virtual network to your private DNS zone.
Using Terraform
Use the following Terraform template to link the virtual network to your private DNS zone:
resource "azurerm_private_dns_zone_virtual_network_link" "example" {
  name                  = "test"
  resource_group_name   = var.resource_group_name
  private_dns_zone_name = var.zone_name
  virtual_network_id    = var.virtual_network_id
}
Verify DNS setup
Any record within the westus3.privatelink.azure.clickhouse.cloud domain should be pointed to the Private Endpoint IP. (10.0.0.4 in this example).
nslookup instance-id.westus3.privatelink.azure.clickhouse.cloud.
Server:     127.0.0.53
Address:    127.0.0.53#53

Non-authoritative answer:
Name:   instance-id.westus3.privatelink.azure.clickhouse.cloud
Address: 10.0.0.4
Add the Private Endpoint GUID to your ClickHouse Cloud organization
ClickHouse Cloud console
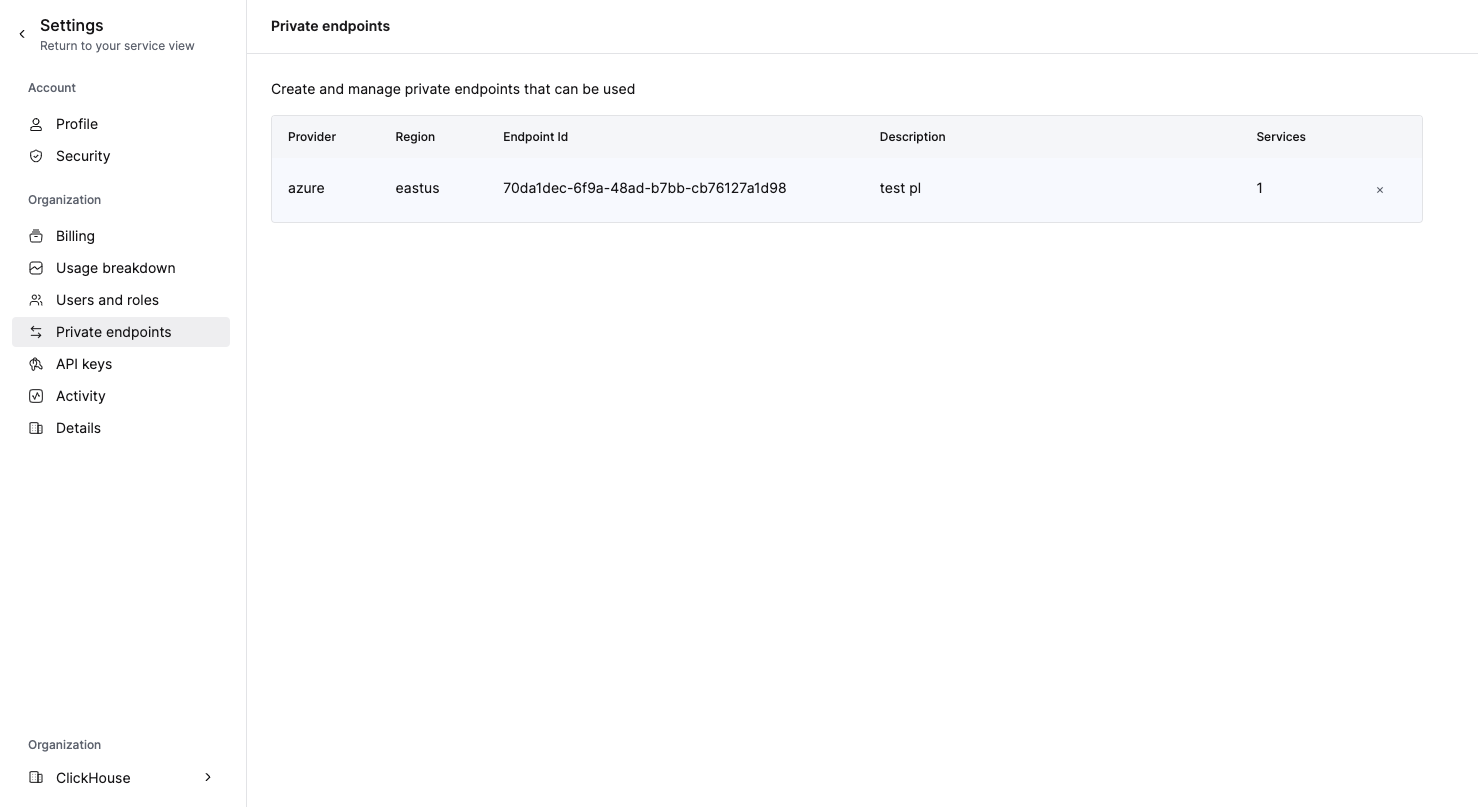
To add an endpoint to organization, proceed to the Add the Private Endpoint GUID to your service(s) allow list step. Adding the Private Endpoint GUID using the ClickHouse Cloud console to the services allow list automatically adds it to organization.
To remove an endpoint, open Organization details -> Private Endpoints and click the delete button to remove the endpoint.
API
Set the following environment variables before running any commands:
PROVIDER=azure
KEY_ID=<Key ID>
KEY_SECRET=<Key secret>
ORG_ID=<set ClickHouse organization ID>
ENDPOINT_ID=<Private Endpoint resourceGuid>
REGION=<region code, use Azure format>
Set the VPC_ENDPOINT environment variable using data from the Obtaining the Private Endpoint resourceGuid step.
Run the following command to add the Private Endpoint:
cat <<EOF | tee pl_config_org.json
{
  "privateEndpoints": {
    "add": [
      {
        "cloudProvider": "azure",
        "id": "${ENDPOINT_ID:?}",
        "description": "Azure private endpoint",
        "region": "${REGION:?}"
      }
    ]
  }
}
EOF
You can also run the following command to remove a Private Endpoint:
cat <<EOF | tee pl_config_org.json
{
  "privateEndpoints": {
    "remove": [
      {
        "cloudProvider": "azure",
        "id": "${ENDPOINT_ID:?}",
        "region": "${REGION:?}"
      }
    ]
  }
}
EOF
After adding or removing a Private Endpoint, run the following command to apply it to your organization:
curl --silent --user ${KEY_ID:?}:${KEY_SECRET:?} -X PATCH -H "Content-Type: application/json" https://api.clickhouse.cloud/v1/organizations/${ORG_ID:?} -d @pl_config_org.json
Add the Private Endpoint GUID to your service(s) allow list
By default, a ClickHouse Cloud service is not available over a Private Link connection even if the Private Link connection is approved and established. You need to explicitly add the Private Endpoint GUID for each service that should be available using Private Link.
ClickHouse Cloud console
In the ClickHouse Cloud console, open the service that you would like to connect via PrivateLink then navigate to Settings. Enter the Endpoint ID obtained from the previous step.
If you want to allow access from an existing PrivateLink connection, use the existing endpoint drop-down menu.

API
Set these environment variables before running any commands:
PROVIDER=azure
KEY_ID=<Key ID>
KEY_SECRET=<Key secret>
ORG_ID=<set ClickHouse organization ID>
ENDPOINT_ID=<Private Endpoint resourceGuid>
INSTANCE_ID=<Instance ID>
Execute it for each service that should be available using Private Link.
Run the following command to add the Private Endpoint to the services allowlist:
cat <<EOF | tee pl_config.json
{
  "privateEndpointIds": {
    "add": [
      "${ENDPOINT_ID:?}"
    ]
  }
}
EOF
You can also run the following command to remove a Private Endpoint from the services allow list:
cat <<EOF | tee pl_config.json
{
  "privateEndpointIds": {
    "remove": [
      "${ENDPOINT_ID:?}"
    ]
  }
}
EOF
After adding or removing a Private Endpoint to the services allow list, run the following command to apply it to your organization:
curl --silent --user ${KEY_ID:?}:${KEY_SECRET:?} -X PATCH -H "Content-Type: application/json" https://api.clickhouse.cloud/v1/organizations/${ORG_ID:?}/services/${INSTANCE_ID?} -d @pl_config.json | jq
Access your ClickHouse Cloud service using Private Link
Each service with Private Link enabled has a public and private endpoint. In order to connect using Private Link, you need to use a private endpoint which will be privateDnsHostname.
Private DNS hostname is only available from your Azure VNET. Do not try to resolve the DNS host from a machine that resides outside of Azure VNET.
Obtaining the Private DNS Hostname
ClickHouse Cloud console
In the ClickHouse Cloud console, navigate to Settings. Click on the Set up private endpoint button. In the opened flyout, copy the DNS Name.

API
Set the following environment variables before running any commands:
KEY_ID=<Key ID>
KEY_SECRET=<Key secret>
ORG_ID=<set ClickHouse organization ID>
INSTANCE_ID=<Instance ID>
Run the following command:
curl --silent --user ${KEY_ID:?}:${KEY_SECRET:?} https://api.clickhouse.cloud/v1/organizations/${ORG_ID:?}/services/${INSTANCE_ID:?}/privateEndpointConfig | jq .result
You should receive a response similar to the following:
{
  ...
  "privateDnsHostname": "xxxxxxx.<region code>.privatelink.azure.clickhouse.cloud"
}
In this example, connection to the xxxxxxx.region_code.privatelink.azure.clickhouse.cloud hostname will be routed to Private Link. Meanwhile, xxxxxxx.region_code.azure.clickhouse.cloud will be routed over the internet.
Use the privateDnsHostname to connect to your ClickHouse Cloud service using Private Link.
Troubleshooting
Test DNS setup
All DNS records from the ${region_code}.privatelink.azure.clickhouse.cloud. zone should be pointed to the internal IP address from the Create a Private Endpoint in Azure step. In this example, the region is westus3.
Run the following command:
nslookup abcd.westus3.privatelink.azure.clickhouse.cloud.
You should receive the following response:
Non-authoritative answer:
Name:   abcd.westus3.privatelink.azure.clickhouse.cloud
Address: 10.0.0.4
Connection reset by peer
Most likely, the Private Endpoint GUID was not added to the service allow-list. Revisit the Add Private Endpoint GUID to your services allow-list step.
Private Endpoint is in Pending state
Most likely, the Private Endpoint GUID was not added to the service allow-list. Revisit the Add Private Endpoint GUID to your services allow-list step.
Test connectivity
If you have problems with connecting using Private Link, check your connectivity using openssl. Make sure the Private Link endpoint status is Accepted.
OpenSSL should be able to connect (see CONNECTED in the output). errno=104 is expected.
openssl s_client -connect abcd.westus3.privatelink.azure.clickhouse.cloud.cloud:9440
CONNECTED(00000003)
write:errno=104
---
no peer certificate available
---
No client certificate CA names sent
---
SSL handshake has read 0 bytes and written 335 bytes
Verification: OK
---
New, (NONE), Cipher is (NONE)
Secure Renegotiation IS NOT supported
Compression: NONE
Expansion: NONE
No ALPN negotiated
Early data was not sent
Verify return code: 0 (ok)
Checking Private Endpoint filters
Set the following environment variables before running any commands:
KEY_ID=<Key ID>
KEY_SECRET=<Key secret>
ORG_ID=<please set ClickHouse organization ID>
INSTANCE_ID=<Instance ID>
Run the following command to check Private Endpoint filters:
curl --silent --user ${KEY_ID:?}:${KEY_SECRET:?} -X GET -H "Content-Type: application/json" https://api.clickhouse.cloud/v1/organizations/${ORG_ID:?}/services/${INSTANCE_ID:?} | jq .result.privateEndpointIds
[]
More information
For more information about Azure Private Link, please visit azure.microsoft.com/en-us/products/private-link.